
Bring out your inner Egyptian queen this Halloween season – Cleopatra style!
Cleopatra was a beauty symbol famous for her super dramatic bold smoky eye with a thick black liner around the eyes. Did you know that her signature eye makeup was not only a beauty expression, but also aided in protecting the eye from various illnesses? Pretty impressive for 1st Century BC makeup!

Cleopatra Makeup Look for Halloween
Historic elements for Cleopatra’s makeup include…
- Thick eyebrows
- Thick black winged eye liner (made from black kohl)
- Bright green shades on the lower eyelids (made from malachite mineral)

Malachite mineral
- Deep blue eye shadow on the upper eyelids with gold colored flakes made from lapis lazuli stone. Talk about real mineral pigments!


Lapis Lazuli Pigment
- She even wore a reddish brown nail polish made from Henna.
For this look I decided to modernize the classic details of blue and green eye shadow that goes all the way up to the brow and pair it with Egyptian-like shape for winged eye liner. To incorporate the gold shades I used a little bit of gold eyeliner on the lower inner corner of the eye as well as a yellow lipstick.
To simplify this look by applying blue eye shadow all the way to the brow bone, defining the depth of the eye with some black or dark green and couple that with a thick eye liner.
Here’s How:
- Concealer:
Start with a face primer and apply it all over the face, concentrating on any dry or rough spots on your skin.
Apply concealer under the eyes, centre of the forehead, chin and cupids bow (optional). Make sure to cover any problem areas such as breakouts.
Blend the concealer in with your finger or a concealer brush.
Tip: using a concealer a shade or two lighter than your foundation color will help highlight the high points of your face to create natural dimension.
I used NYX HD Photogenic Concealer in CW02.

Cleopatra Makeup Tutorial Step 1 – Concealer
2. Foundation
Next I’m using my favorite foundation brush – the Buffing brush from Real Techniques Core collection to apply the foundation.
Start by squeezing out a few pumps of foundation onto the back of your hand (make sure your hands are clean first!), then dab the brush into the foundation and start stippling it all over your face, and finally buff it out using circular motions.
Tip: bring the foundation down to your neck to make sure the face and the neck match in color. Cleopatra appears to have quite a tan so I chose a foundation shade that is a little bit darker than my natural.
I’m using NYX HD Studio Foundation in 02 Soft Beige.

Cleopatra Makeup Tutorial Step 2 – Foundation
3. Set With Powder
Now it’s time to set the foundation in order to prevent it from moving. This step will also prolong the wear and make for a smooth base to apply contour and blush powders.
I used Real Techniques Powder Brush. This must be THE FLUFFIEST brush ever… if you don’t believe me come visit us at Phoenix, I promise it won’t disappoint!
I powdered my face with NYX HD Powder. HD powders are very finely milled which allows their super small particles to set the foundation seamlessly. However, be very careful not to over-apply it!
Tip: make sure to use a light hand applying any HD powder and always tap off the excess powder off before applying it!

Cleopatra Makeup Tutorial Step 3 – Set With Powder
4. Contouring
The purpose of contouring is to define the receding parts of our face such as the hollows of the cheeks in order to give it a slimmer appearance. This same effect can be applied to create a shadow on the sides of the nose making appear thinner. We always try to achieve an appearance of an oval face, therefore for my round face shape I have to darken the corners of my face: the temples, cheek hollows and the jawline.
Cleopatra had a strong jawline so I applied some contouring on my chin as well.
Remember, this is a Halloween look, so you can go as intense as you wish !
Tip: if you find that your contour is going blotchy or you’ve applied it in an undesirable place, go back in with your face powder over it, this will help soften the look.
To contour I used an angled brush with NYX Highlight and Contour Powder.

Cleopatra Makeup Tutorial Step 4 and 5 Contour Blush
5. Blush
I used a light pink blush from NYX in shade PB07 – Natural. Apply the blush just above where you placed your contour and smooth it outward with light brush strokes.
Another great color for this look is Cinnamon – this orange blush will perfectly compliment the yellow lipstick!
6. Big Brows!
Cleopatra had very thick and defined brows, if you’d like you can go ahead and even use a black eye/eyebrow pencil for this step, especially if you have darker hair!
To correctly map out the brow shape use this measuring trick to mark the start and end points of your brow:
- Place a line starting at your nostril passing the inner corner of the eye, this is your starting point.
- Your brow should end where a diagonal line stretching from the nostril intersects the outer corner of the eye.
Start by lining the bottom part of the brow and then outline the top shape. Fill it in and lighten the application as it gets closer to the nose. I used NYX AUTO Eyebrow Pencil in EP05 Dark Brown. Use the brush at the end of the pencil to feather out the start of the brow.
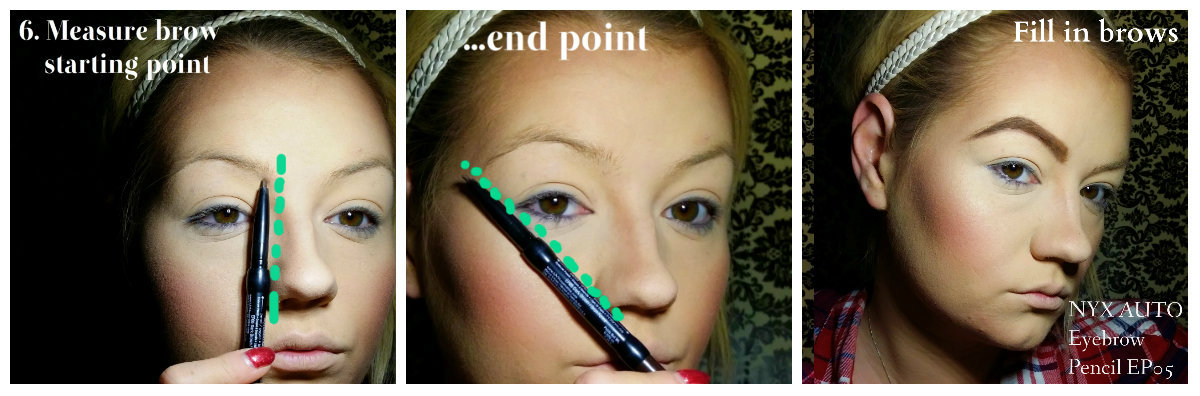
Cleopatra Makeup Tutorial Step 6 – Big Eyebrows2
7. Eyes
Now that we have a flawless base to work with let’s move on to the part that defines this look – the eyes. I chose to modernize the eye shadow look by adding different shades of blue and green to give it more detail and dimension and opted for an Egyptian-like shape for the eye liner instead of a simple thick line out.
You can simply this step by sticking to one shade of blue raised all the way to the eyebrow and add a little bit of gold under the bottom lashes paired with thick liner.
Follow this pictorial clockwise.
- Apply a white eye shadow under the brow and a teal/blue shadow up to the brow bone.
- On the mobile eye lid I used NYX Jumbo Pencil in color Milk (white) to prime it.
- Add a deeper blue starting at the outer corner of your crease (the fold of the eye) and work your way inwards.
- To create a gradient I used a light shimmery blue on the mobile eyelid.
- Add a touch of light green in the inner corner of your eye, just like the malachite mineral Cleopatra used on her eyes.
- Take a black shadow and starting at the outer corner in deepen the darker blue that we used earlier. You can now start the flick of the eyeliner using a liquid liner. I used NYX Liquid Black Liner BEL06.This will serve as a guide to where we place our Egyptian-like shape.
- Connect the eyeliner flick to your lash line.
- Continue drawing a line towards the inner corner of your eye.
- Once you reach the inner corner, draw a sharp thin line inwards, past the natural shape of the eye. Then using a retractable eyeliner pencil (softer creamy texture) map out the shape. Don’t worry about it being messy for now.
- I used NYX Matte Black Liner BEL02 to trace the mapped out shape. Then, using a creamy concealer and a flat brush I cleaned up the edges. Tight-line using the same eyeliner, that is: line the inner top and bottom rim of the eye.
- I used white eyeliner to fill in the shape to give it some pop and also smooth out any jagged inner edges. I also applied gold eye liner to the lower lash line.
- Apply mascara; I used NYX Doll Eye Mascara in Extreme Jet Black.
- Lastly, apply NYX Macaron Lippie in Citron. This really helps to pull the whole look together and now you’re ready to be the Queen!
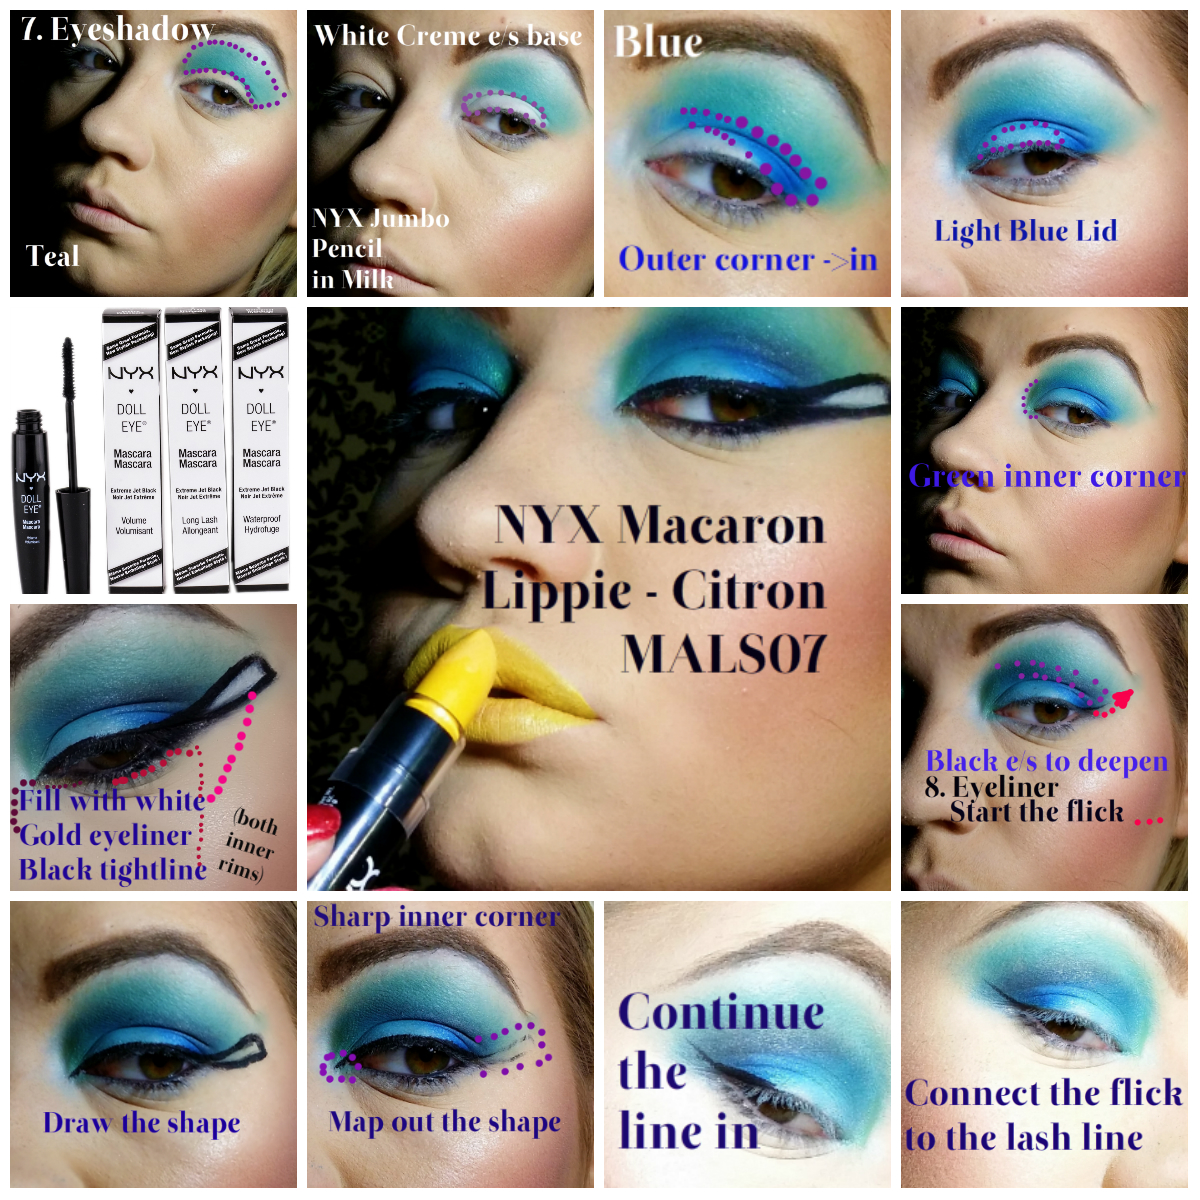
Cleopatra Makeup Tutorial Step 7 – Eyeshadow and Lips
I hope you enjoyed this tutorial, let me know what you will be dressing up as this Halloween and if you recreate this look share it with us on Facebook at https://www.facebook.com/PhoenixBeautyLoungeCanada!
Thank you and take care,
Evelina

Just, brilliant.
And the yellow liostick is cherry on the makeup top.
Thanks so much Catherine! That lipstick definitely pulls it all together, and what’s a better occasion to wear it than Halloween!