Now Available for Pre-Order: OPI San Francisco 2013

Remember our preview post on the fantastically fab OPI San Francisco collection for Fall / Winter 2013? We heard from our people that it’s coming out soon, so…

OPI-SF-PO

We’ve opened up the OPI San Francisco Fall / Winter 2013 collection for pre-orders. We’ll be shipping pre-orders as soon as the collection arrives; we’re expecting it to hit shelves in early August. Be the first to get these shades!   🙂

China Glaze Sunsational Summer 2013 Swatches

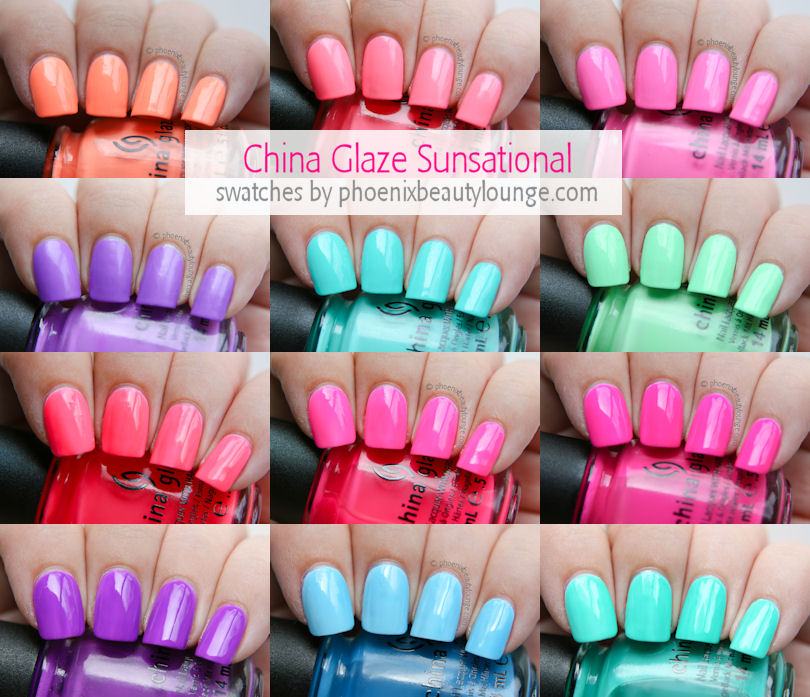
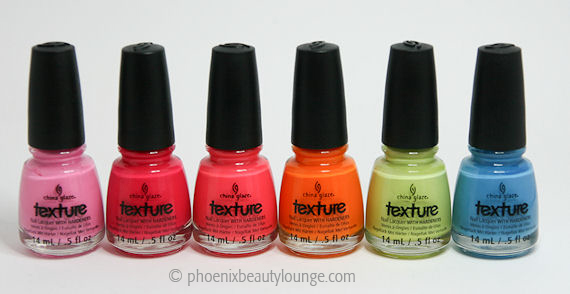
Hi everyone! Today we finally bring you our exclusive swatches of this years China Glaze Summer collection for 2013, SUNSATIONAL. This collection is for all lovers of bright shades, as they really pack a punch! China Glaze decided to feature two finishes in this collection, cremes and jellies. First up we’ll take a look at the six Sunsational creme shades.chinaglazesunsationalcremes

From left to right: Sun Of A Peach, Neon & On & On, Bottoms Up, That’s Shore Bright, Too Yacht To Handle, Highlight Of My Summer.

How stunning are these Sunsational Cremes? We’re absolutely in love! Every single one of the shades is simply beautiful. These cremes are what you would call neon pastels. If you love pastels and neons than you will ADORE the Sunsational cremes. They merge the best of both worlds and have created opaque neons that don’t compromise. We’ll let the swatches speak for themselves!

chinaglazesunsational_sunofapeach

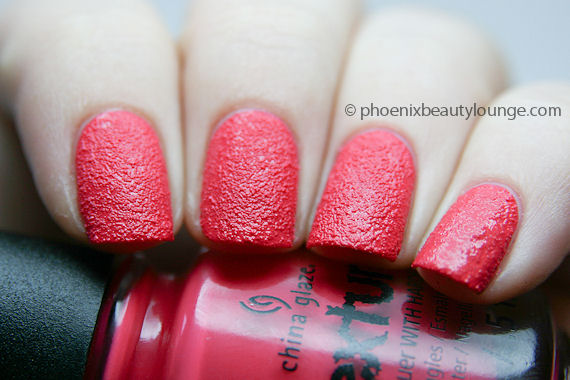
China Glaze Sunsational Sun Of A Peach: First up is this amazing neon pastel coral creme. We suspect this was inspired by one of the most popular China Glaze shades, Flip Flop Fantasy. If you loved that shade, you will love this one even more! It packs a lot more punch than Flip Flop Fantasy and is about ten times brighter. We love it! Perfect pedicure shade. This was three coats.

chinaglazesunsational_neonandonandon

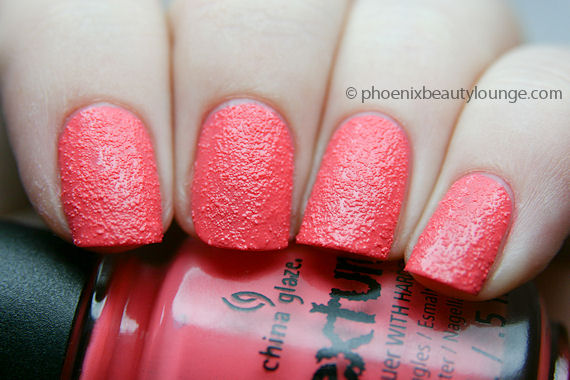
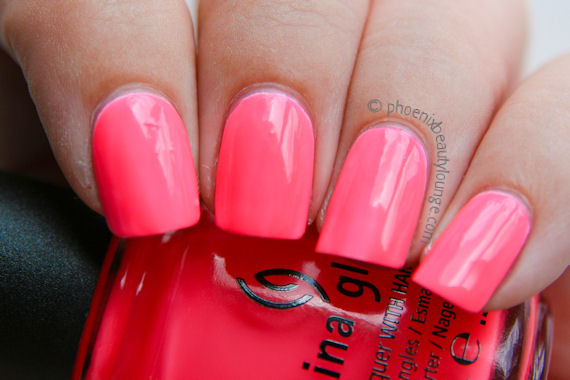
China Glaze Sunsational Neon & On & On: Next up is this warm neon pastel pink. You won’t believe how bright this is! It is such a gorgeous colour. It slightly leans towards coral so it’s great for all you olive skin toned ladies out there! But that won’t stop us from wearing it too. This was three coats.

chinaglazesunsational_bottomsup

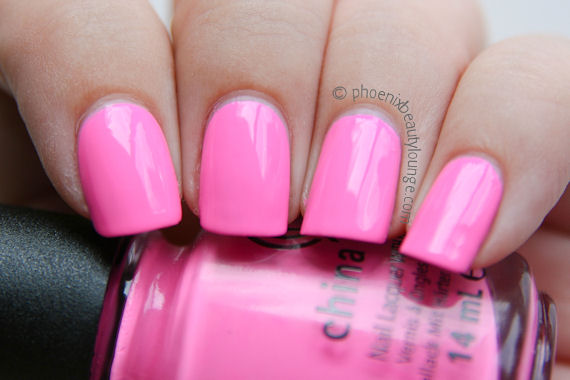
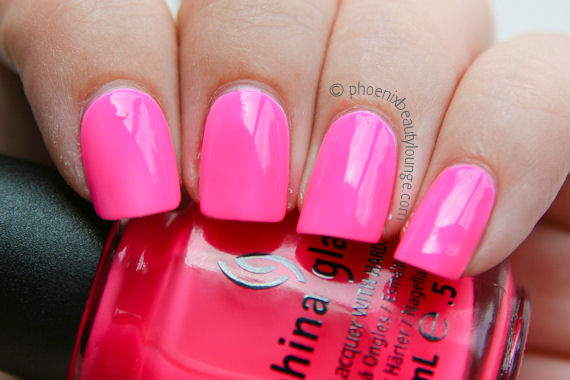
China Glaze Sunsational Bottoms Up: This shade is very much like the previous colour, Neon & On & On, only a lot more blue-toned. This is definitely a hot Barbie pink! A must-have in any pink lovers nail polish collection. How cute will this look on your toes? This entire collection is full of perfect pedicure shades! This was two coats.

chinaglazesunsational_thatsshorebright

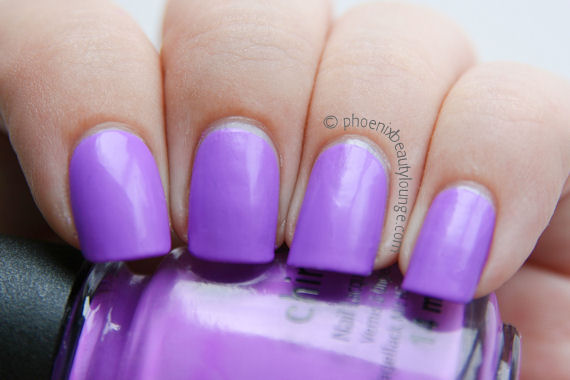
China Glaze Sunsational That’s Shore Bright: Next up is this bright pastel purple. Not quite as neon as the others but definitely bright! As you can see, it has a matte finish. This is the same for ALL cremes, so we recommend slapping on a nice coat of glossy Seche Vite fast drying top coat for a shiny finish. This was two coats.

chinaglazesunsational_tooyachttohandle

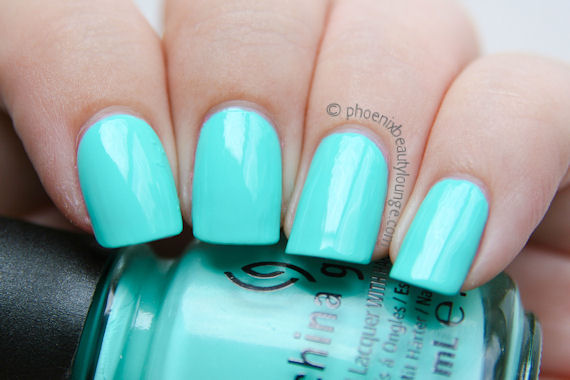
China Glaze Sunsational Too Yacht To Handle: Now how bright is this turquoise? Wow! Too Yacht To Handle is a gorgeous bright turquoise colour. It had a flawless formula and was great in application. Another must-have! This was three coats.

chinaglazesunsational_highlightofmysummer

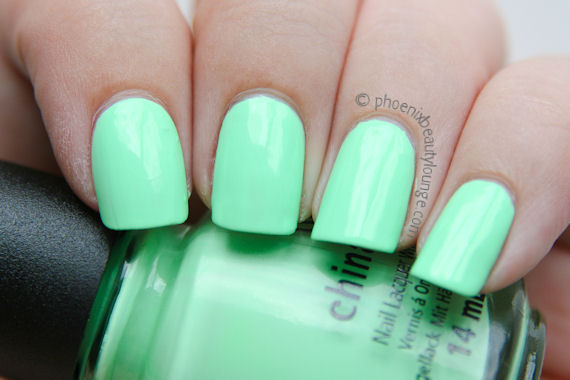
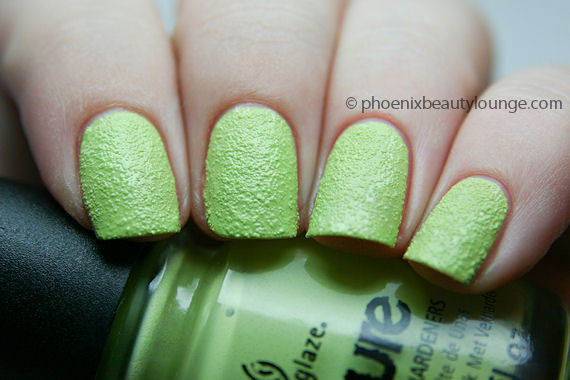
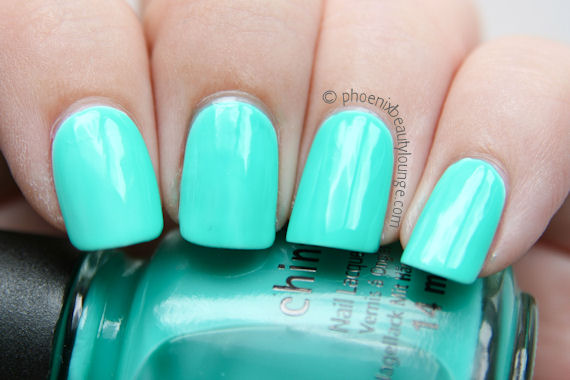
China Glaze Sunsational Highlight Of My Summer: Finally the last shade of the Sunsational cremes. This is an ah-mazing pastel neon mint green. This is easily our favourite shade from the whole collection! You’ll find nothing like this in your nail polish collection, it’s such a unique shade. This was three coats.

chinaglazesunsationaljellies

From left to right: Shell-O, Heat Index, You Drive Me Coconuts, Are You Jelly?, Isle See You Later, Keepin’ It Teal.

Next up are the Sunsational Jellies. As you may or may not know, jellies have a very squishy and shiny finish. They’re also usually quite sheer and require a few layers for opacity. Some of these are difficult to get opaque on their own so we decided to show their beauty to the max and layer them over one coat of white. If you want your neons to stand out, layering them over white makes them even brighter! Let’s take a look.

chinaglazesunsational_shello

China Glaze Sunsational Shell-O: This is the first of the jellies and this colour is a gorgeous coral pink jelly. It’s slightly more coral in person and definitely a lot brighter! Another great summery shade. This was three coats over one coat of white.

chinaglazesunsational_heatindex

China Glaze Sunsational Heat Index: Next up is this bright neon pink jelly! It’s slightly warmer in person, more like how it looks in the bottle. These shades are too bright for our camera to handle! This was three coats over one coat of white.

chinaglazesunsational_youdrivemecoconuts

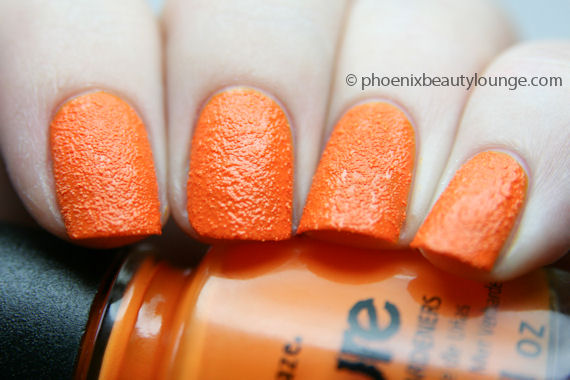
China Glaze Sunsational You Drive Me Coconuts: How amazing is this pink? WOW! This is one of the brightest pinks we’ve seen in a while. It doesn’t disappoint! By the way, how cute are these names? We love you China Glaze! This was three coats over one coat of white.

chinaglazesunsational_areyoujelly

China Glaze Sunsational Are You Jelly?: Next up is this gorgeous bright purple. This is a really deep warm bright purple. Great for all you purple lovers out there! You will love this! This was three coats over one coat of white.

chinaglazesunsational_isleseeyoulater

China Glaze Sunsational Isle See You Later: Now this is a very interesting polish. It’s extremely sheer, almost impossible to get opaque on its own. We’re not quite sure what China Glaze had in mind for this colour. Having said that, layered over white, we think it looks great! This was, again, three coats over one coat of white.

chinaglazesunsational_keepinitteal

China Glaze Sunsational Keepin’ It Teal: Finally another bright turquoise colour. It leans slightly towards green which we love. A beautiful shade! It really packs a punch when you layer it over white. This was three coats over one coat of white.

chinaglazesunsational

And finally, of course, the Pinnable collage. 🙂 Aren’t these shades wonderful? We’re a huge fan of this collection and we are certain you will love it too. They weren’t easy to capture as they are so incredibly bright. Definitely a collection you need to see in person to fully appreciate!

You can find all China Glaze Sunsational shades available for purchase at Phoenix Beauty Lounge. They’re very popular and as we just got another shipment of them in, make sure to be quick if you want to get your hands on them! Which shades will you be picking up?

OPI San Francisco Fall / Winter 2013 Collection Preview

Following their tradition of world travel, OPI is taking us to the west coast with their OPI San Francisco Fall / Winter 2013 Collection. This new collection features not six, not twelve, but a whopping fifteen urban chic shades, including three Liquid Sand! Let’s take a look…

San-Francisco-by-OPI-OPI-Fall-Winter-2013-Nail-Lacquer-Collection-Preview

Continue reading

Essie Naughty Nautical 2013

Summer evokes images of the beach, water sports and relaxing cruises. This summer we don’t have to go all the way to the marina to look like savvy swimsters, thanks to Essie’s newest collection, Naughty Nautical 2013. Inspired by chiffon cover-ups and pastel evening looks, these shades are perfect for any kind of summer adventure, from fun in the sun to a book under a beach umbrella.

We’re happy to announce the new Essie Naughty Nautical 2013 shades! Let’s take a peek.

Essie-Naughty-Nautical-Summer-2013-nail-polish-collection

Continue reading

Marimekko Nail Art Tutorial

Hi everyone! Today we have another nail art tutorial for you. This nail art manicure is perfect for Spring and Summer, featuring this years Spring shades by OPI and China Glaze. This time the skill level is for intermediate nail painters, but beginners can leave out a few of the more intricate steps and still have a great result. Let’s take a look!

springmarimekkotutorial

Doesn’t it look beautiful? We love Marimekko fashion prints. They are so inspiring and simply perfect for a Spring-themed manicure. The image below shows our inspiration for this manicure. These are four prints by Finnish design company, Marimekko. Their signature style is bold graphic prints with bright colours. They are distinctive and very recognizable.

Prints-Inspired-by-Marimekko

Now let’s take a look at our step-by-step tutorial shall we?

springmarimekkonails

  1. Start with a base colour. We’re using two coats of a plain white, OPI Alpine Snow.
  2. With a detailer nail art brush create five-petal flowers in random places. We’re using a lovely periwinkle blue from the China Glaze Spring collection, China Glaze Fade Into Hue. Make sure to leave open some spaces since we’ll be adding more flowers in another shade! If you wish, you can stop here and add top coat. Or you can add some of the finishing details in the next few steps. It’s entirely up to you!
  3. Fill in the gaps with more five-petal flowers. We’re using another shade from the China Glaze Avant Garden collection, China Glaze Fancy Pants. You can add “half” flowers that fall off the edge of your nail so it looks like the pattern is continuous.
  4. With a lighter color blue, add a dot in the center of each flower. We’re using China Glaze Keep Calm, Paint On which is a lovely pale mint green. For easy dots use a dotting tool!
  5. Using a dark blue shade, add tiny dots in the middle of the dots we just placed. We’re using OPI I Saw… U Saw… We Saw… Warsaw. This is the finishing touch to the flowers! Aren’t they looking great?
  6. With the same dark blue and a liner nail art brush, add stems in between the flowers. This is a little tricky, as you have to make sure the lines are very thin. This will give you the best result! Try to barely touch the nail and just let the brush flow across to form a line.

Add top coat and you’re done! We recommend Seche Vite for ultra-fast drying results and a dazzling shiny finish.

marimekkonails

And here we have it, the final result! Looks great, right?! It’s such a bold design and it looks really effective on the nails too. People will be amazed that you painted it by hand!

If you try out this design after seeing our tutorial, make sure to let us know by leaving a comment or posting your picture to our Facebook page. We’d love to see what you make of this Marimekko print. Thanks for checking out our tutorial and happy painting!

China Glaze Texture Swatches

Hi everyone! Today we’re finally sharing swatches of the China Glaze Texture collection for Summer 2013. This collection features (you guessed it!) six texture finish polishes that are bright, bright and BRIGHT! These shades scream summer at the beach, in so many different ways. Let’s take a look!

ChinaGlazeTextureCollection

These are the six China Glaze Texture collection shades. Aren’t they stunning? There’s a bright pink, corals, orange, green and blue. From left to right the shades are called: Unrefined, Bump & Grind, Itty Bitty & Gritty, Toe-Tally Textured, In The Rough, Of Coarse!. Now, shall we take a look at the nail swatches?

ChinaGlaze_Texture_Unrefined

China Glaze Unrefined: First up, this lovely pale (yet bright!) bubblegum pink. This is two coats of texture polish. As you can see the texture finish is very visible, and the polish dries to a matte soft finish. Even though it looks very gritty, it feels surprisingly soft to the touch!

ChinaGlaze_Texture_BumpGrind

China Glaze Bump & Grind: This is a cute magenta red, not quite pink though not quite red either. Imagine pink and red having a lovechild, this would be the colour that came out! Here you can still see some shine to the polish, as it takes a while before the full matte finish shows. You definitely have to be patient with these texture polishes. They require some tender love and patience!

ChinaGlaze_Texture_IttyBittyGritty

China Glaze Itty, Bitty & Gritty: This is a lovely coral pink. We love coral shades! And this is such a pretty one. It won’t fail to cheer you up and brighten your day. P.s. this looks stunning as a pedicure too!

ChinaGlaze_Texture_Toe-TallyTextured

China Glaze Toe-Tally Textured: This is a super bright orange! Wow! It just jumps out at you, doesn’t it? It’s even brighter in person too! We know orange polishes aren’t for everyone, but you definitely need to try this one out.

ChinaGlaze_Texture_InTheRough

China Glaze In The Rough: This is a fun pale green. We think China Glaze couldn’t decide on whether to include yellow or green in this collection and simply went for a mix of both. This is such a quirky shade! By the way, didn’t they do an awesome job at naming these polishes? We simply love the cute names!

ChinaGlaze_Texture_OfCoarse

China Glaze Of Coarse!: And of course, the final shade! This is a lovely cobalt blue polish. All swatches were made with two coats but if you layer it slightly thicker you can easily get away with just one coat. They are so opaque! You’ll be very surprised!

ChinaGlaze_Texture

And lastly, a pretty pinnable collage and overview of all six shades. Which one do you prefer? We love the coral shade Itty, Bitty & Gritty, but the pale pink Unrefined is definitely worth checking out too. It’s surprisingly wearable and you’ll find yourself falling in love with the texture finish.

The China Glaze Textures are slightly different to the OPI Liquid Sand polishes. These are matte cremes that carry a big punch and a bright pop of color, whereas most OPI Liquid Sands lean more towards the jelly finish and feature shimmery glitters for an entirely different effect. We’re undecided which texture finish effect we love more, but these China Glaze Textures are definitely worth checking out!

You can find the entire China Glaze Texture collection with us for sale at Phoenix Beauty Lounge.

Nail Art Tutorial: Polka Dots

Today we’re sharing another special Phoenix Beauty Lounge how-to with you! Last time we showed you how to create Ikat Print Nails, today we’re sharing another great beginner tutorial. This time we’ll be teaching you how to create the perfect polka dot!

Polka dots are a cute and simple design, perfect for all ages. If you’ve never tried this design before, there’s a few simple tricks that can help you to achieve the perfect pattern. After all, polka dots aren’t random! They form a uniform pattern which is easy to achieve with a few tips.

polkadots

Here’s a fun black and nude polka dot we created! We used a new OPI shade from the Mariah Carey collection, this is OPI A Butterfly Moment. A pretty pink frosty nude, paired up with a black polka dot.

The first thing you will need to make a polka dot is a dotting tool. This is a fun tool that is used for a lot of nail art designs, but don’t worry if you don’t own one (yet). You can easily replace a dotting tool by using a bobby pin, a toothpick or even a pencil! Once you’ve tried polka dots several times, I can promise you that you’ll find yourself wanting a dotting tool. They’re cheap and they make creating dots on your nails all the more fun! 🙂

How-To_PolkaDots

  1. Start by applying your base color. We’re using OPI A Butterfly Moment.
  2. The easiest way to start is by adding a dot in the middle of your nails. Use your dotting tool to place a black dot in the center of your nail.
  3. The next step is to paint several dots in a vertical row. Space them out evenly, not too close and not too far apart. Practice on a piece of paper if you are unsure at first!
  4. Now we need to add the second row. Place the dots a little to the right of the first row, and in the middle of the previous dots.
  5. Try to draw an invisible horizontal line in your head, following the dots on the third row (left) so they will be parallel to the second row we painted in step 4.
  6. Final step is to fill in the rest of the nails, we added two more final rows on either side.

Finish with some glossy top coat and you’re all done! Make sure to wait until all the dots are completely dry so you don’t smear your design. Quick tip: if you find that you smear your design easily with your top coat, try holding your brush parallel to the base of your nail. Use a very light touch and try not to touch your actual nail with the brush, only letting the top coat glide over your nails. You’ll notice that your design won’t smear as easily, or at all! Good luck!

We hope you enjoyed this tutorial on how to achieve the perfect polka dot nails! If you try them out make sure to send us pictures so we can admire your work. Who knows, we might even feature your nails on our blog!

Happy painting! – Phoenix Beauty Lounge.