Essie Naughty Nautical 2013

Summer evokes images of the beach, water sports and relaxing cruises. This summer we don’t have to go all the way to the marina to look like savvy swimsters, thanks to Essie’s newest collection, Naughty Nautical 2013. Inspired by chiffon cover-ups and pastel evening looks, these shades are perfect for any kind of summer adventure, from fun in the sun to a book under a beach umbrella.

We’re happy to announce the new Essie Naughty Nautical 2013 shades! Let’s take a peek.

Essie-Naughty-Nautical-Summer-2013-nail-polish-collection

Continue reading

Marimekko Nail Art Tutorial

Hi everyone! Today we have another nail art tutorial for you. This nail art manicure is perfect for Spring and Summer, featuring this years Spring shades by OPI and China Glaze. This time the skill level is for intermediate nail painters, but beginners can leave out a few of the more intricate steps and still have a great result. Let’s take a look!

springmarimekkotutorial

Doesn’t it look beautiful? We love Marimekko fashion prints. They are so inspiring and simply perfect for a Spring-themed manicure. The image below shows our inspiration for this manicure. These are four prints by Finnish design company, Marimekko. Their signature style is bold graphic prints with bright colours. They are distinctive and very recognizable.

Prints-Inspired-by-Marimekko

Now let’s take a look at our step-by-step tutorial shall we?

springmarimekkonails

  1. Start with a base colour. We’re using two coats of a plain white, OPI Alpine Snow.
  2. With a detailer nail art brush create five-petal flowers in random places. We’re using a lovely periwinkle blue from the China Glaze Spring collection, China Glaze Fade Into Hue. Make sure to leave open some spaces since we’ll be adding more flowers in another shade! If you wish, you can stop here and add top coat. Or you can add some of the finishing details in the next few steps. It’s entirely up to you!
  3. Fill in the gaps with more five-petal flowers. We’re using another shade from the China Glaze Avant Garden collection, China Glaze Fancy Pants. You can add “half” flowers that fall off the edge of your nail so it looks like the pattern is continuous.
  4. With a lighter color blue, add a dot in the center of each flower. We’re using China Glaze Keep Calm, Paint On which is a lovely pale mint green. For easy dots use a dotting tool!
  5. Using a dark blue shade, add tiny dots in the middle of the dots we just placed. We’re using OPI I Saw… U Saw… We Saw… Warsaw. This is the finishing touch to the flowers! Aren’t they looking great?
  6. With the same dark blue and a liner nail art brush, add stems in between the flowers. This is a little tricky, as you have to make sure the lines are very thin. This will give you the best result! Try to barely touch the nail and just let the brush flow across to form a line.

Add top coat and you’re done! We recommend Seche Vite for ultra-fast drying results and a dazzling shiny finish.

marimekkonails

And here we have it, the final result! Looks great, right?! It’s such a bold design and it looks really effective on the nails too. People will be amazed that you painted it by hand!

If you try out this design after seeing our tutorial, make sure to let us know by leaving a comment or posting your picture to our Facebook page. We’d love to see what you make of this Marimekko print. Thanks for checking out our tutorial and happy painting!

China Glaze Texture Swatches

Hi everyone! Today we’re finally sharing swatches of the China Glaze Texture collection for Summer 2013. This collection features (you guessed it!) six texture finish polishes that are bright, bright and BRIGHT! These shades scream summer at the beach, in so many different ways. Let’s take a look!

ChinaGlazeTextureCollection

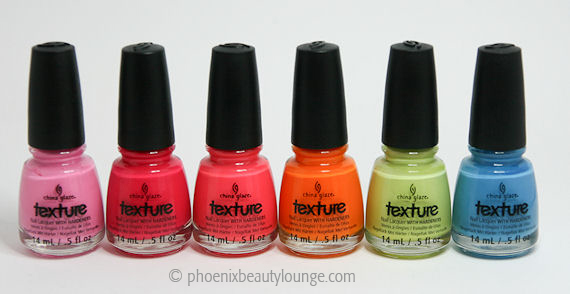
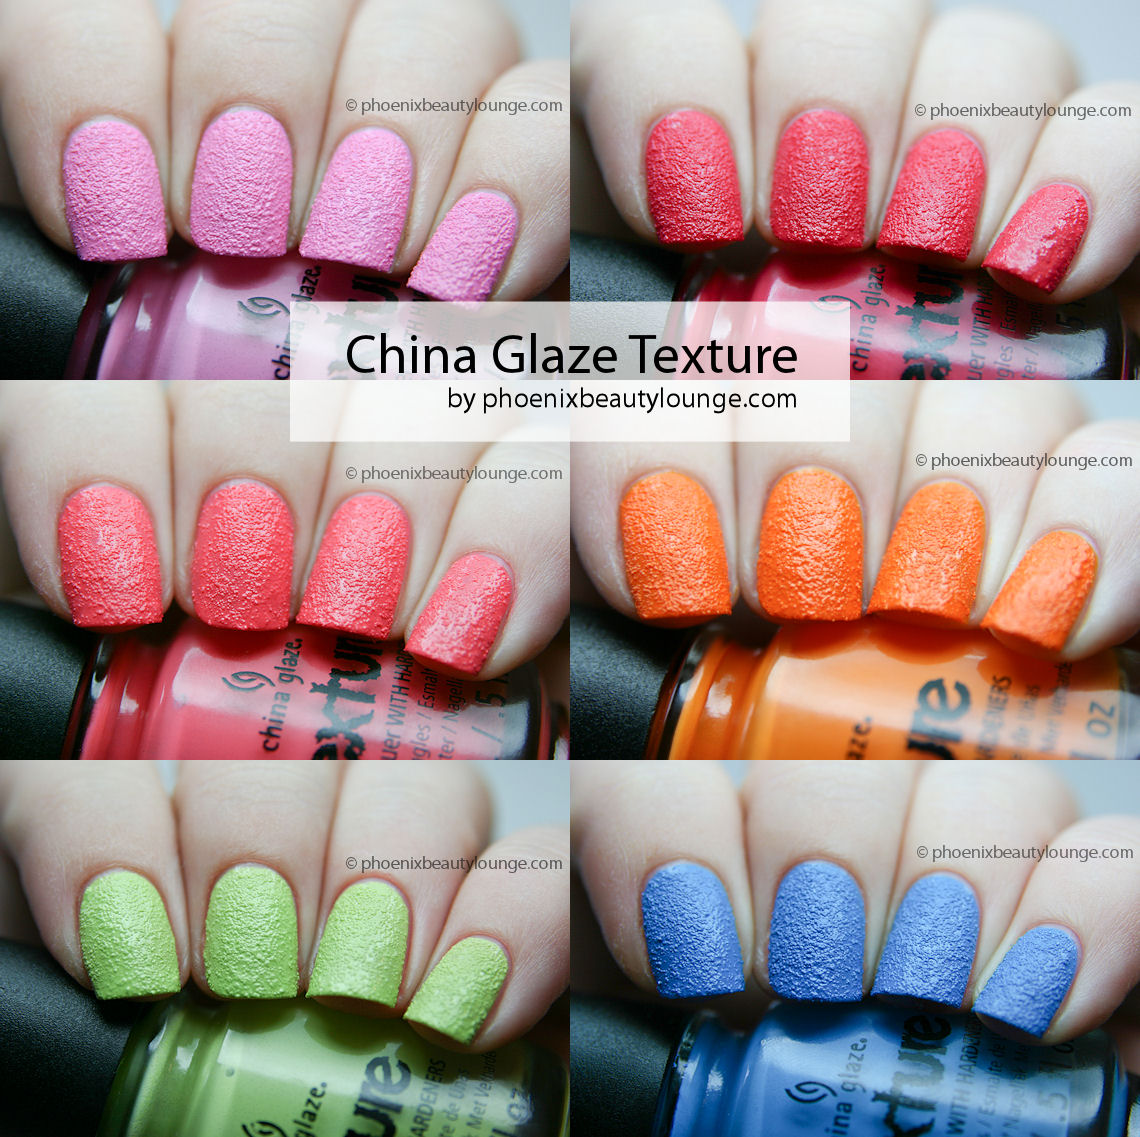
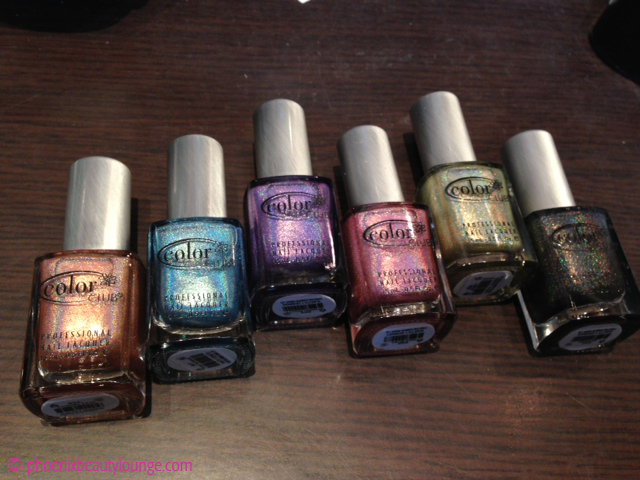
These are the six China Glaze Texture collection shades. Aren’t they stunning? There’s a bright pink, corals, orange, green and blue. From left to right the shades are called: Unrefined, Bump & Grind, Itty Bitty & Gritty, Toe-Tally Textured, In The Rough, Of Coarse!. Now, shall we take a look at the nail swatches?

ChinaGlaze_Texture_Unrefined

China Glaze Unrefined: First up, this lovely pale (yet bright!) bubblegum pink. This is two coats of texture polish. As you can see the texture finish is very visible, and the polish dries to a matte soft finish. Even though it looks very gritty, it feels surprisingly soft to the touch!

ChinaGlaze_Texture_BumpGrind

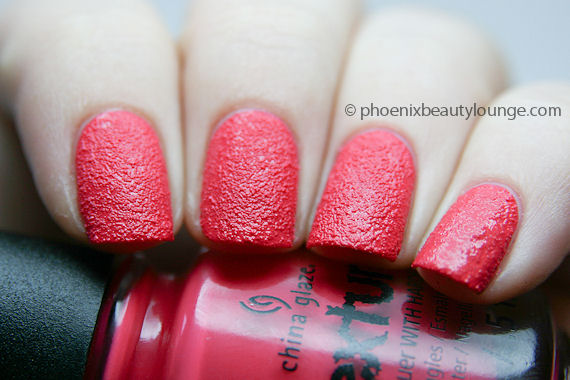
China Glaze Bump & Grind: This is a cute magenta red, not quite pink though not quite red either. Imagine pink and red having a lovechild, this would be the colour that came out! Here you can still see some shine to the polish, as it takes a while before the full matte finish shows. You definitely have to be patient with these texture polishes. They require some tender love and patience!

ChinaGlaze_Texture_IttyBittyGritty

China Glaze Itty, Bitty & Gritty: This is a lovely coral pink. We love coral shades! And this is such a pretty one. It won’t fail to cheer you up and brighten your day. P.s. this looks stunning as a pedicure too!

ChinaGlaze_Texture_Toe-TallyTextured

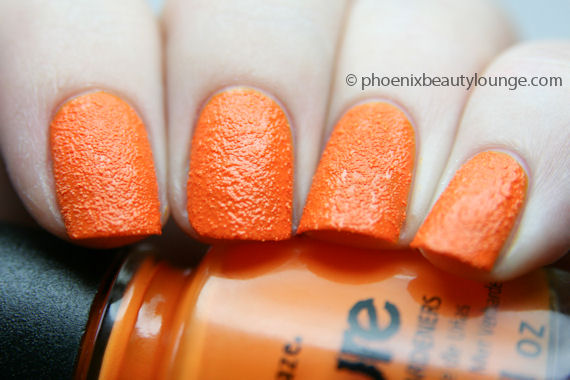
China Glaze Toe-Tally Textured: This is a super bright orange! Wow! It just jumps out at you, doesn’t it? It’s even brighter in person too! We know orange polishes aren’t for everyone, but you definitely need to try this one out.

ChinaGlaze_Texture_InTheRough

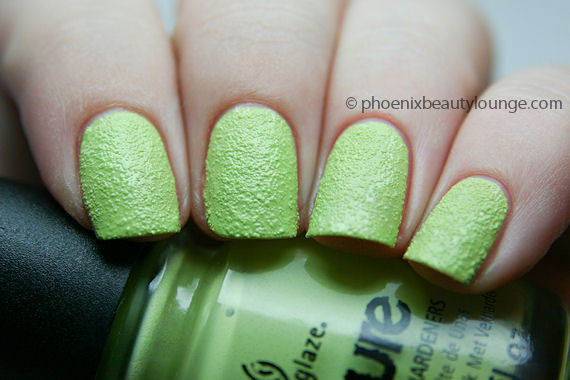
China Glaze In The Rough: This is a fun pale green. We think China Glaze couldn’t decide on whether to include yellow or green in this collection and simply went for a mix of both. This is such a quirky shade! By the way, didn’t they do an awesome job at naming these polishes? We simply love the cute names!

ChinaGlaze_Texture_OfCoarse

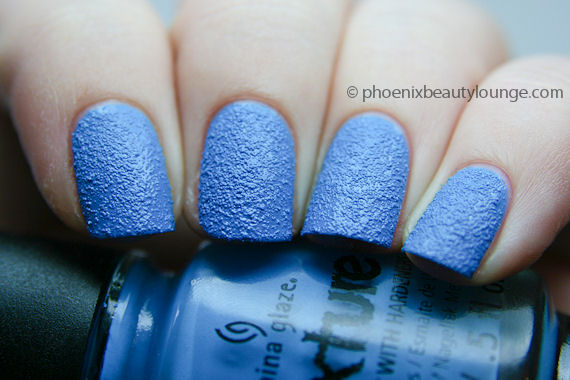
China Glaze Of Coarse!: And of course, the final shade! This is a lovely cobalt blue polish. All swatches were made with two coats but if you layer it slightly thicker you can easily get away with just one coat. They are so opaque! You’ll be very surprised!

ChinaGlaze_Texture

And lastly, a pretty pinnable collage and overview of all six shades. Which one do you prefer? We love the coral shade Itty, Bitty & Gritty, but the pale pink Unrefined is definitely worth checking out too. It’s surprisingly wearable and you’ll find yourself falling in love with the texture finish.

The China Glaze Textures are slightly different to the OPI Liquid Sand polishes. These are matte cremes that carry a big punch and a bright pop of color, whereas most OPI Liquid Sands lean more towards the jelly finish and feature shimmery glitters for an entirely different effect. We’re undecided which texture finish effect we love more, but these China Glaze Textures are definitely worth checking out!

You can find the entire China Glaze Texture collection with us for sale at Phoenix Beauty Lounge.

Nail Art Tutorial: Polka Dots

Today we’re sharing another special Phoenix Beauty Lounge how-to with you! Last time we showed you how to create Ikat Print Nails, today we’re sharing another great beginner tutorial. This time we’ll be teaching you how to create the perfect polka dot!

Polka dots are a cute and simple design, perfect for all ages. If you’ve never tried this design before, there’s a few simple tricks that can help you to achieve the perfect pattern. After all, polka dots aren’t random! They form a uniform pattern which is easy to achieve with a few tips.

polkadots

Here’s a fun black and nude polka dot we created! We used a new OPI shade from the Mariah Carey collection, this is OPI A Butterfly Moment. A pretty pink frosty nude, paired up with a black polka dot.

The first thing you will need to make a polka dot is a dotting tool. This is a fun tool that is used for a lot of nail art designs, but don’t worry if you don’t own one (yet). You can easily replace a dotting tool by using a bobby pin, a toothpick or even a pencil! Once you’ve tried polka dots several times, I can promise you that you’ll find yourself wanting a dotting tool. They’re cheap and they make creating dots on your nails all the more fun! 🙂

How-To_PolkaDots

  1. Start by applying your base color. We’re using OPI A Butterfly Moment.
  2. The easiest way to start is by adding a dot in the middle of your nails. Use your dotting tool to place a black dot in the center of your nail.
  3. The next step is to paint several dots in a vertical row. Space them out evenly, not too close and not too far apart. Practice on a piece of paper if you are unsure at first!
  4. Now we need to add the second row. Place the dots a little to the right of the first row, and in the middle of the previous dots.
  5. Try to draw an invisible horizontal line in your head, following the dots on the third row (left) so they will be parallel to the second row we painted in step 4.
  6. Final step is to fill in the rest of the nails, we added two more final rows on either side.

Finish with some glossy top coat and you’re all done! Make sure to wait until all the dots are completely dry so you don’t smear your design. Quick tip: if you find that you smear your design easily with your top coat, try holding your brush parallel to the base of your nail. Use a very light touch and try not to touch your actual nail with the brush, only letting the top coat glide over your nails. You’ll notice that your design won’t smear as easily, or at all! Good luck!

We hope you enjoyed this tutorial on how to achieve the perfect polka dot nails! If you try them out make sure to send us pictures so we can admire your work. Who knows, we might even feature your nails on our blog!

Happy painting! – Phoenix Beauty Lounge.

Real Techniques – Your Eyes Starter Set review

A few days ago we shared an in-depth review of the Real Techniques Your Base core collection with you, and today we’re sharing the Real Techniques Your Eyes Starter set. As the name suggest, this set features everything you need for eyeshadow application and everything to do with eye make-up. Let’s take a look!

realtechniques_youreyesstarterset copy

The Real Techniques brushes are extremely high quality and made from synthethic Taklon brushes that are incredibly soft. The density of the brushes will enable you to blend and apply your makeup to perfection! The Real Techniques Your Eyes Starter Set comes with five brushes and the 2-in-1 case + stand.

realtechniques_youreyesstarterset3 copy

The handles of the brushes are very sleek and stylish. Each range has a distinct colour, the purple colour refers to the Enhanced Eyes range of brushes. The ferrules are smooth matte aluminum and the ends have a soft matte rubberized finish. The matte finish of the handles makes these very pleasant to hold. They are lightweight and sit comfortably in your hands.

realtechniques_youreyesstarterset2 copy

The brushes that come in this set are: base shadow brush, accent brush, brow brush, deluxe crease brush and the pixel-point eyeliner brush. Let’s go over each of these brushes individually and discuss what they do best!

realtechniques_deluxecreasebrush copy

Real Techniques – Deluxe Crease Brush

This brush is an amazing blending brush. It’s round, really dense and blends eyeshadow like no other! It looks fairly large at first but you’ll soon notice how easily this blends the eyeshadow in your crease. We adore this brush!

realtechniques_baseshadowbrush copy

Real Techniques – Base Shadow Brush

This is a great brush for applying color to your lid. Use it with a patting motion to apply eyeshadow on your lid. Its pointed shape leans itself towards precise blending as well. Another great mutli-tasker!

realtechniques_accentbrush copy

Real Techniques – Accent Brush

This is a nifty little brush. It’s perfect for a whole range of tasks! Smudging eyeliner close to the lashline, applying highlight to the inner corners of the eyes, even applying lipstick or eyeliner! It’s just the perfect amount of stiffness while still being soft and non-scratchy.

realtechniques_pixelpointeyelinerbrush copy

Real Techniques – Pixel-Point Eyeliner Brush

This brush is your friend when you need to apply eyeliner or lipstick. Samantha cleverly shows us how to use this brush in her video. She uses this brush with a gel eyeliner to apply a perfect winged eyeliner.

realtechniques_browbrush copy

Real Techniques – Brow Brush

Finally we have the brow brush. This one is, as the name suggests, great for applying powder to shape your brows. We also like it for eyeliner application and even for applying eyeshadow underneath the lower lashline. A great brush that’s very soft too!

That concludes the break down of all 5 brushes included in the Real Techniques Your Eyes Starter set. We’ve noticed again that these brushes are all great multi-taskers and suited for a whole number of different types of products. With this set you’ll guaranteed flawless eye make-up application.

You can find the Real Techniques Your Eyes Starter set available for purchase at Phoenix Beauty Lounge! Have you tried Real Techniques brushes or are you a fan of Pixiwoo? Let us know in the comments!

Brow Line Brow Stencils

Hi everyone! There’s a new product that arrived at Phoenix Beauty Lounge! These are the Brow Line brow stencils which comes in a pack of 6 different styles. These stencils are amazing tools that help you achieve the perfect arched brow. Let’s take a look!

browstencils

  • Style 1: Flirty
  • Style 2: Uptown Girl
  • Style 3: Femme Fatale
  • Style 4: Diva
  • Style 5: Hollywood
  • Style 6: Cleopatra

As you can see, the stencils range from thinner brows to a more fuller brow, high arched and lower arched. Pick your stencil according to your personal style, mood or occasion. These stencils are made from durable plastic and are easy to clean.

Here’s a few tips and step-by-step guide on how to use these brow stencils:

  1. Start by brushing your eyebrows with an eyebrow groomer. Brush them upwards and groom them if necessary.
  2. Align your chosen style of stencil with your natural starting- and ending point of your brows. Hold the stencil firmly in place with one hand.
  3. Fill in your brows with either an eyebrow pencil or a powder that matches your hair color. Use short brush strokes to create a natural look, simulating hairs. Fill in the entire brow, staying inside the stencil.
  4. Remove the stencil and turn it over. Now place it on your other brow and follow the same steps.

Et voilà! You now have perfect brows!

Brows frame the face and can really open up your eyes. They are an important step to your make-up and are often overlooked. You’d be surprised at how much a tiny tweak to your eyebrows can change the entire structure of your face. Shaping your brows can help you feel more confident and fuller brows can make you look younger and fresh-faced. Fixing and shaping your brows isn’t hard, especially with these brow stencils you’ll be able to tackle perfect brows in no time! 🙂

You can find this set of Brow Line brow stencils on our site, Phoenix Beauty Lounge.

Color Club Halo Hues Announcement

Hi everyone! We have an exciting announcement for you! We now have the amazing Color Club Halo Hues 2013 holographic shades available for purchase on our site and in-store. We’re absolutely blown away by the amazing rainbow sparkles of this collection.

If you’re in the Toronto area, make sure to come and check these out at Phoenix Beauty Lounge, Pacific Mall. Simply no pictures or swatches can prepare you for how gorgeous these are!

ColorClubHaloHues

These are the six colors featured in the collection.

We shot some quick snaps of these beauties in-store. It’s so hard to capture the amazing rainbow sparkle! You definitely have to see these in person to appreciate the full effect.

photo-49

This is our in-store display! Come check it out at Pacific Mall! photo-50

Can you see the holo sparkle? 🙂 In this picture, Color Club Beyond (the black holo) shows you a hint of how amazing the rainbow holo effect is! It’s probably times ten in person!

Head over to our website Phoenix Beauty Lounge or drop us a visit to check out the stunning Color Club Halo Hues! Enjoy!


Essie Wedding 2013

Each year Essie releases a new Wedding collection, soft shades suited for the brides-to-be. These collections don’t feature sheer pinks or pale whites though! No, Essie pushes the envelope with subtle colour and creamy candy hues. Who said that wedding nails had to be boring?

We’re happy to announce the new Essie Wedding 2013 shades! Let’s take a look.

essie-wedding-collection-2013

These four new shades make up the Essie Wedding 2013 collection. Pastel pinks, lavender and a soft fuchsia. These shades are the perfect addition and soft pop of colour for a bridal look.

Wedding1

Essie-Spring-Summer-2013-Wedding-Collection

The star of the collection is Essie Using My Maiden Name. This is the shade we’re most excited about! This beautiful soft lavender periwinkle colour is certainly going to leave a lasting impression. It’s subtle, feminine and certainly not boring!

This collection will hit the shelves around May 2013 but we have it available now for pre-order on our site, Phoenix Beauty Lounge. Would you wear any of these shades to your wedding? Or are you dying to get your hands on these anyway, wedding or not? 🙂 Let us know in the comments!

Real Techniques – Your Base Core Collection

Hi everyone! A few days ago we announced a new brand that was added to our store, Real Techniques. This is an amazing brand of high quality make up brushes that is much loved in the blog community! Created by make-up lover and pro make up artist, Samantha Chapman, famous from YouTube channel Pixiwoo.

We promised you an in-depth review of the brush sets and today we’re sharing the first one! Let’s take a look at the first set we have in store for you, Real Techniques Your Base Core collection.

realtechniques_yourbasecorecollection copy

The Real Techniques Your Base Core collection comes with four brushes and a 2-in-1 brush case+stand. The case is extremely practical and is great for on-location or for when you’re traveling. Throw it in your bag to protect your brushes, and pull open the case to reveal a stand.

realtechniques_yourbasecorecollection1 copy

The packaging of the brushes is very sleek. Each range has a distinct colour, the orange colour refers to the Flawless Base range of brushes. The ferrules are smooth matte aluminum and the ends have a soft matte rubberized finish. The matte finish of the handles makes these very pleasant to hold. They are lightweight and sit comfortably in your hands.

realtechniques_yourbasecorecollection3 copy

The brushes are made out of synthetic Taklon hairs which are extremely soft! The Taklon bristles are 100% cruelty free which is great. Synthetic fibres will also hold their shape much better over time. The soft fibres will help you create a super smooth finish!

Let’s take a look at each of the brushes individually.

realtechniques_buffingbrush copy

Real Techniques – Buffing Brush 

This brush is large and flares out on either side. The buffing brush is perfect for, as the name suggest, buffing your foundation into your skin. You can use this with liquid, cream, even powder. It’s a great multi-tasker!

realtechniques_contourbrush copy

Real Techniques – Contour Brush

This contouring brush is so soft! It’s really smooth and perfect to help you create an airbrushed finish. We love to use this for blusher, bronzer or highlighter.

realtechniques_detailerbrush copy

Real Techniques – Detailer Brush

This pointed brush is perfect for concealer application or for lipstick. We prefer it for the latter! It’s just the right amount of stiffness for lipstick application while still being soft and giving a smooth finish. Applying lipstick with a brush will not only make your lipstick last longer but also give a nicer finish!

realtechniques_pointedfoundationbrush copy

Real Techniques – Pointed Foundation Brush

This pointed foundation brush is perfect for liquid foundation application. It’s pointed shape will help you reach all the corners of your face, under the eyes, around the nose, etc.

That concludes the break down of all 4 brushes included in the Real Techniques Your Base Core Collection set. We’ve noticed these brushes are all great multi-taskers and suited for a whole number of different types of products. These brushes cover almost all tasks to do with application of base products like foundation, blush, powder, concealer, etc. A definite must-have!

You can find the Real Techniques Base Core Collection set available for purchase at Phoenix Beauty Lounge! Have you tried Real Techniques brushes or are you a fan of Pixiwoo? Let us know in the comments!